
Why Learning How to Install a Block Paving Driveway Transforms Your Home
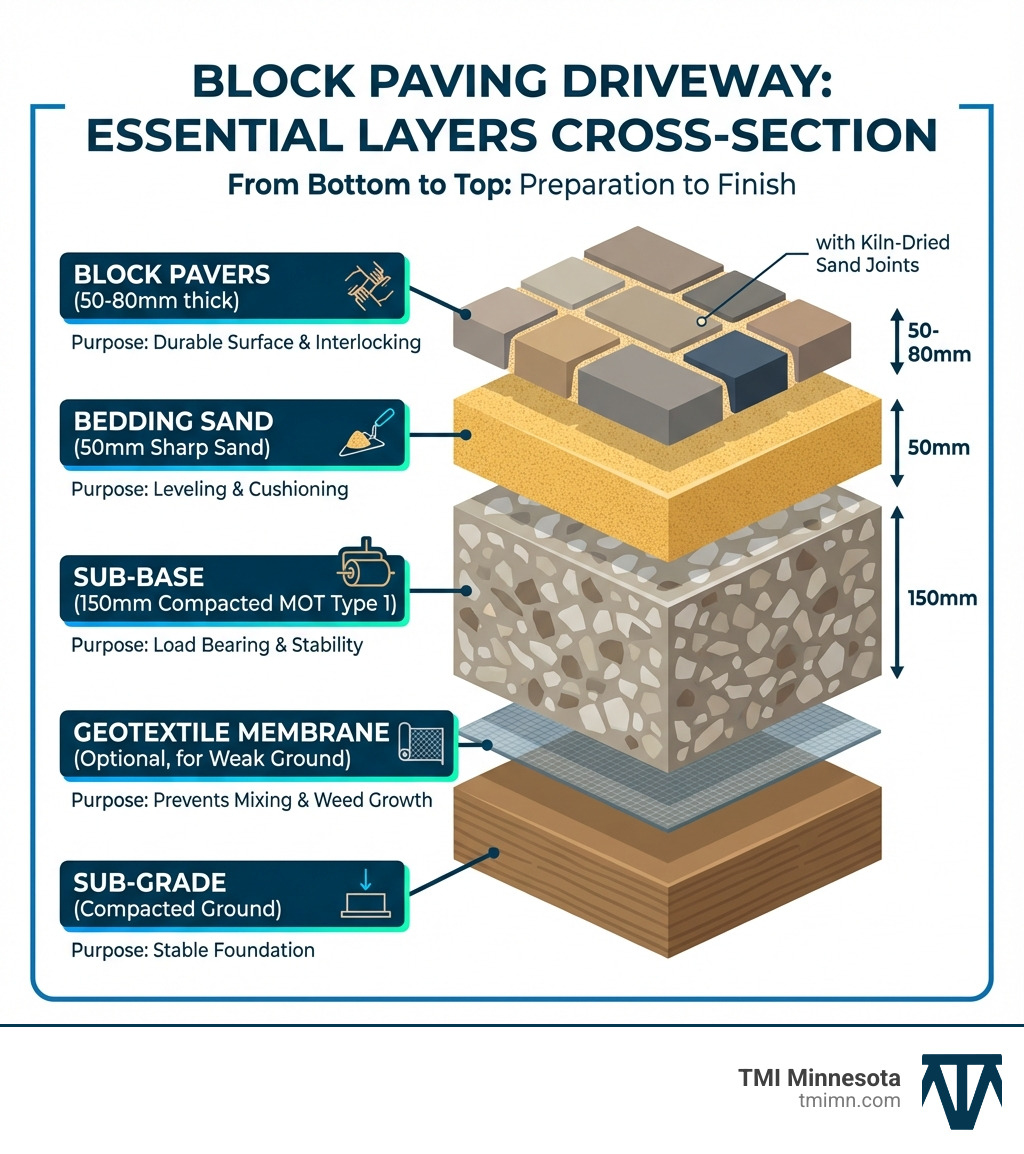
How to install a block paving driveway is a project that can dramatically improve your home’s curb appeal and property value. The process involves seven core phases: excavating to approximately 250mm depth, laying a 150mm compacted MOT Type 1 sub-base, installing edge restraints with concrete haunching, screeding a 50mm sharp sand bedding layer, laying the paving blocks with 2-5mm joints, cutting blocks to fit edges, and compacting with kiln-dried sand to lock everything in place.
A professionally finished block paved driveway is an investment that can last over 20 years when installed correctly. The key to a pristine, long-lasting driveway versus one that settles, shifts, or grows weeds lies in proper preparation. As paving specialist Trevor Knight puts it: the hardcore sub-base “gives stability to the drive and will stop sinking, dipping and give longevity.”
The main challenge isn’t laying the blocks, but understanding the critical groundwork that comes first. Poor sub-base preparation is the number one cause of driveway failure, leading to costly repairs. Additionally, many homeowners don’t realize they may need a permit, especially if the new driveway affects public drainage systems.
This guide will walk you through every stage of the installation process, from calculating materials and understanding drainage requirements to achieving that professional finish. You’ll learn which tools are essential, what mistakes to avoid, and when it makes sense to call in professionals.
I’m Christopher Deanovic, Operations Leader at Task Masters, and I’ve spent years overseeing the installation of block paved driveways throughout Minnesota. My experience has taught me that meticulous foundation work is the key to a driveway that delights for decades.
How to install a block paving driveway vocabulary:
Phase 1: Planning, Permissions, and Preparation

Before moving dirt, meticulous planning is your secret weapon. This phase sets the stage for a successful, long-lasting driveway by covering design, material calculations, and crucial safety and regulatory requirements. A little planning now saves a lot of headaches later.
Key Considerations Before You Learn How to Install a Block Paving Driveway
A project like how to install a block paving driveway requires the right tools and materials. Skimping here can lead to delays or a compromised finish. Here is what you’ll need:
Essential Tools:
- Plate Compactor (Wacker Plate): Essential for compacting the sub-base and pavers. A rubber mat attachment is needed for delicate blocks.
- Spirit Level: For ensuring proper slopes and level surfaces.
- String Line & Pegs: For marking the area, establishing falls, and keeping lines straight.
- Rubber Mallet: For gently tapping pavers into place.
- Shovel & Wheelbarrow: For excavation and moving aggregate. A mini-digger can speed up excavation on large areas.
- Block Splitter/Saw: A block splitter is great for straight cuts, while a diamond blade saw is necessary for intricate shapes.
- Screed Rails & Straight Edge: For precisely leveling the sand bedding layer.
- Tape Measure: For accurate calculations and layout.
- Broom & Rake: For spreading materials and sweeping.
- Personal Protective Equipment (PPE): Gloves, safety glasses, sturdy footwear, and ear protection are non-negotiable.
Essential Materials:
- Block Pavers: Order at least 5-10% extra for cuts and breakages.
- MOT Type 1 Sub-base (or local equivalent crushed aggregate): The foundation. A crushed aggregate providing a stable, load-bearing layer.
- Sharp Sand (grit sand): For the bedding layer, providing better stability than softer sands.
- Kiln-Dried Sand: Fine, dry sand swept into the joints to interlock the blocks.
- Edge Restraints/Kerbs: These frame the driveway, holding it together.
- Cement & Ballast (for concrete haunching): To secure the edge restraints.
- Geotextile Membrane (optional but recommended): A fabric that separates the sub-grade from the sub-base, preventing intermixing while allowing drainage.
For more inspiration on how to integrate these elements into your overall outdoor vision, check out our More info about our Hardscape Design Services.
Designing Your Driveway & Ensuring Proper Drainage
Design is about both aesthetics and functionality, especially drainage.
First, consider the look. Do you prefer classic herringbone or something more contemporary? Our Block Pave Patterns page offers ideas. When calculating quantities, measure your area precisely and add 5-10% extra for cuts and breakages.
Next, and critically, establish a sufficient fall for water runoff. Water is the enemy of any driveway if it doesn’t drain properly. Aim for a minimum gradient of 1:80 (a 1cm drop for every 80cm of length), ideally 1:60, to ensure rainwater flows away from your home and does not create puddles.
For driveways that fall towards the house or in areas with poor natural drainage, you may need to incorporate drainage channels or soakaways. Channels collect water and direct it away, while soakaways are underground pits that allow water to disperse into the ground. These are crucial for managing surface water.
Thinking about the bigger picture? Our guide on Landscaping Around Driveways can help you integrate your new driveway seamlessly with your landscape.
Do I Need Planning Permission?
This is a key question that often surprises homeowners. Regulations vary by municipality in the Twin Cities, so it is always wise to check with your local planning department before starting.
Generally, if you are laying a new driveway with traditional, impermeable paving materials, and the rainwater runs off your property onto the road or into public storm drains, you may need a permit. This is to help manage surface water runoff and prevent localized flooding.
The good news? You often will not need a permit if you use materials that allow water to pass through, such as permeable block paving. These systems are designed to let water seep through the joints into a specialized sub-base, which acts as a reservoir before slowly releasing the water into the ground. This aligns with Sustainable Drainage Systems (SuDS) principles, which are increasingly important for environmental management. For a general overview of SuDS concepts, see this concise explanation on Sustainable drainage systems.
When considering permeable options, our Permeable Paver Driveways guide offers valuable insights. For us in the Twin Cities, a quick call to your local planning office will clarify any specific requirements for your project.
Phase 2: Groundwork – Building a Solid Foundation
This phase builds the backbone of the driveway. A solid, well-prepared foundation prevents common issues like sinking, rutting, and shifting blocks, ensuring your project’s longevity. The required depth and compaction of the sub-base are critical, especially for driveways with heavy vehicle traffic. For large SUVs or trucks, we often increase the sub-base thickness to 200-250mm, compared to the standard 150mm for typical cars.
Step 1: Excavation
First, we clear the canvas.
- Marking Out the Area: Use string lines and pegs to precisely mark the driveway’s perimeter. Allow extra space at free edges for easier work.
- Excavation Depth: For a typical driveway, excavate to a depth of approximately 230-250mm (9-10 inches) below the finished paving level. This accommodates the sub-base, bedding sand, and pavers. The finished level must be at least 150mm (two brick courses) below the damp-proof course (DPC) of any adjoining buildings to prevent moisture issues.
- Removing Existing Driveway and Spoil: Remove any old surface. For large areas, a mini-digger is efficient. Plan for spoil disposal, as excavated material can bulk up by 20-30%.
- Compacting the Sub-Grade: After excavating, inspect the sub-grade (the natural ground). Dig out any soft spots and backfill with compacted sub-base material. Then, compact the entire exposed surface with a plate compactor to create a firm, even base.
Step 2: Installing the Sub-Base
This is where the driveway’s real strength comes from.
- Laying a Geotextile Membrane: On soft or wet sub-grade, lay a permeable geotextile membrane. This separator prevents the sub-base from sinking into the ground while allowing water to drain. It’s an optional but wise investment.
- MOT Type 1 Aggregate: Bring in your MOT Type 1 (or equivalent crushed aggregate). This material provides excellent load-bearing capacity and drainage.
- Building Up in Layers: Spread the sub-base material in layers no more than 75-100mm (3-4 inches) thick at a time. This is crucial for proper compaction. As a guide, 185mm of uncompacted Type 1 will compact down to 150mm.
- Compacting Each Layer Thoroughly: Use the plate compactor to make multiple passes (at least 4-6, alternating directions) over each layer until it’s dense and firm. The goal is a minimum compacted depth of 150mm (6 inches) for most residential driveways, or 200-250mm for heavy-use driveways. Maintain your established drainage falls throughout this process.
Step 3: Setting the Edge Restraints
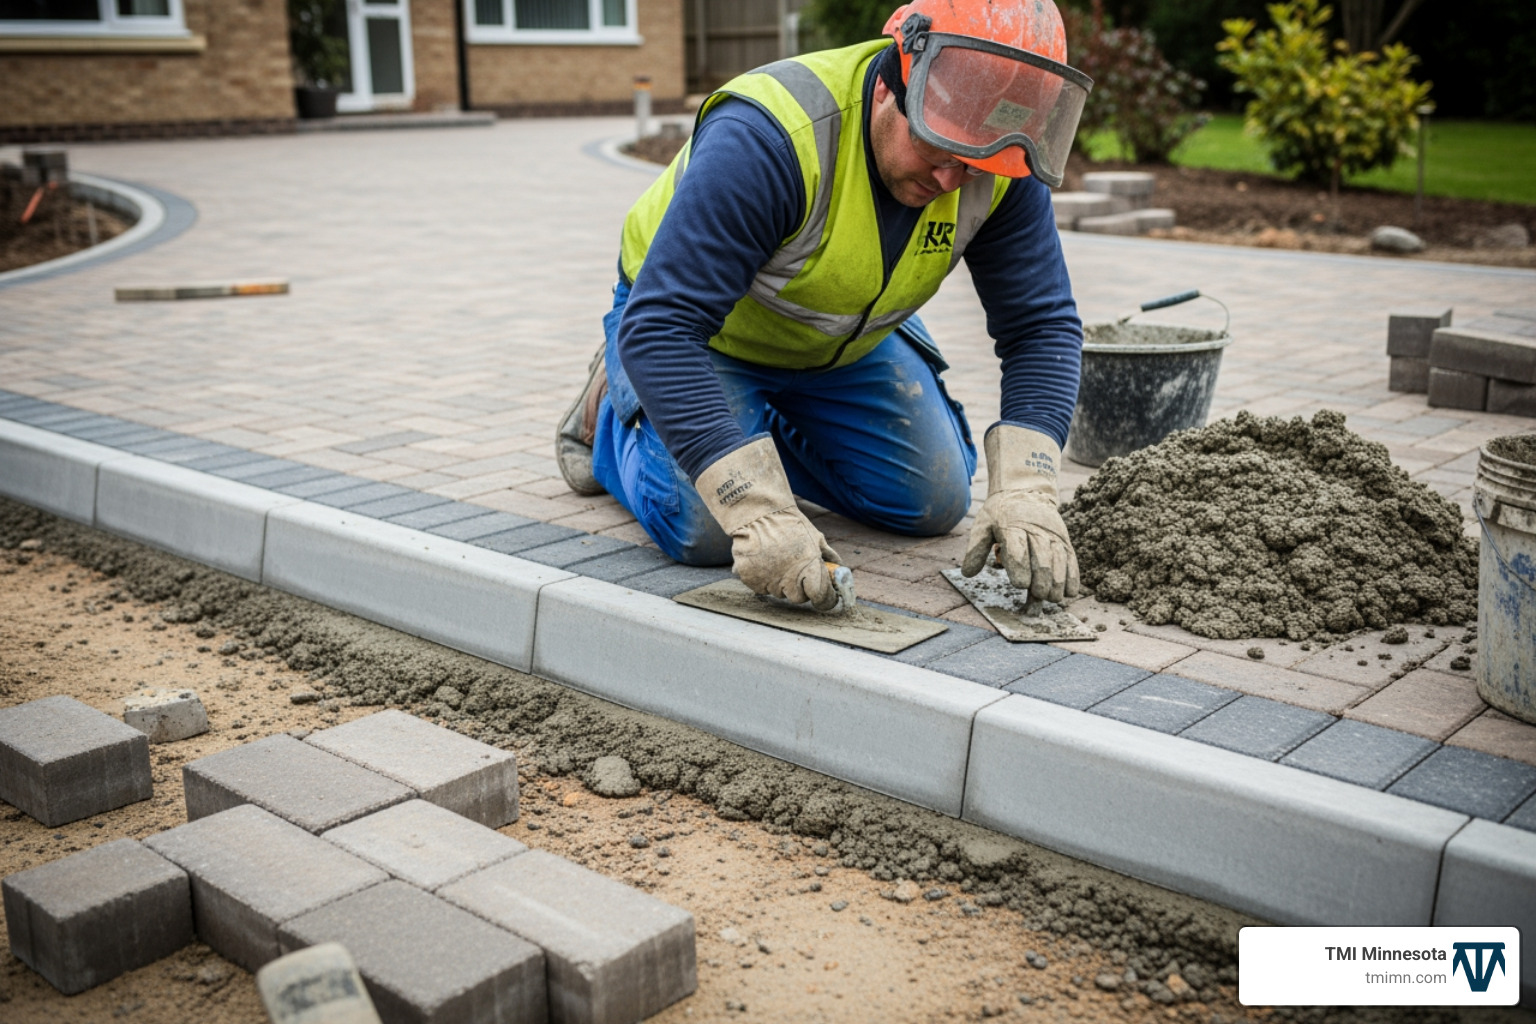
Edge restraints frame the driveway and hold everything in place. Without them, blocks would push outwards, and the driveway would lose its integrity.
- Purpose of Restraints: Edge restraints prevent the lateral movement of paving blocks and bedding sand, which is especially important where vehicles exert significant force.
- Laying Kerbs on a Concrete Bed: Lay your chosen edge restraints on a fresh bed of concrete, typically 100mm (4 inches) deep and wide. A common mix is 1 part cement to 6 parts ballast.
- Using String Lines for Level and Alignment: Use string lines and a spirit level to ensure the kerbs are straight, level (or following the desired fall), and at the correct height.
- Haunching with Concrete for Stability: Once the kerbs are in place, “haunch” them by applying a concrete mix (often a semi-dry mix of 3 parts grit sand to 1 part cement) to the back of the kerb. This creates a triangular support at least 75mm thick that locks it firmly into the ground. Let this concrete set before proceeding.
How to Install a Block Paving Driveway: The Laying Process
This is where the design comes to life. Precision during the laying process ensures a beautiful, stable, and long-lasting finish.
Step 4: Screeding the Sand Bedding Layer
This layer is crucial for the final level and stability of the pavers.
- Using Damp Sharp Sand: Spread a layer of damp sharp sand over the compacted sub-base. The sand should be damp enough to hold its shape but not saturated.
- Target Depth of 50mm: Aim for a loose, uncompacted depth of approximately 50mm (2 inches). This will compact down to about 30-40mm once the blocks are laid and compacted.
- Using Screed Rails and a Straight Edge: Lay screed rails (metal bars or rigid timber) across the area, set to the exact finished level of the sand bed. Using a straight edge, pull it along the rails to “screed” the sand to a perfectly smooth and level surface. Fill any gaps left by the rails with sand and trowel them level. Do not compact the sand at this stage.
- Achieving a Smooth, Firm, and Level Surface: The goal is a uniform surface that provides full support to each block. Avoid walking on the screeded sand.
Step 5: Laying the Paving Blocks
Now for the main event.
- Choosing a Starting Point: Start laying blocks from a fixed, straight edge, such as the bottom of a slope or a building wall. This provides a stable reference point.
- Popular Laying Patterns: The 45° or 90° Herringbone patterns are highly recommended for driveways. They offer maximum interlock, which is crucial for resisting the forces of vehicle traffic.
- Working from the Laid Paving: As you lay blocks, work from the already-laid surface to avoid disturbing the screeded sand bed.
- Mixing Blocks from at Least 3 Packs: To avoid color patching or “banding,” always grab blocks vertically from at least three different open packs at a time.
- Maintaining a 2-5mm Joint Gap: Lay the blocks “hand-tight,” ensuring a consistent 2-5mm gap between each one. Many concrete blocks have small “nibs” on the sides to aid spacing. Gently tap blocks into place with a rubber mallet if needed, making sure they sit 3-5mm proud of the desired final level, as they will settle during compaction.
Step 6: Cutting and Fitting Blocks
Cutting is an inevitable and important part of the process.
- Cutting Blocks for Edges and Obstacles: You will need to cut blocks to fit along irregular edges, around drains, or other obstacles.
- Using a Block Splitter for Straight Cuts: For simple, straight cuts, a mechanical block splitter is efficient and effective.
- Using a Diamond Blade Saw for Complex Cuts: For intricate shapes, curves, or harder materials, a diamond blade saw is necessary.
- Safety Equipment (Goggles, Mask): When cutting, safety is paramount. Always wear safety goggles and a dust mask, especially when using power saws. Water suppression systems on saws also help reduce dust.
- Avoiding Cuts Smaller Than One-Third of a Block: As a rule, avoid cutting blocks to less than one-third of their original size. Small pieces can be unstable and prone to dislodging. When possible, position the cut face against an adjacent block rather than an edge restraint for a tidier, more stable finish.
Phase 3: Finishing Touches and Long-Term Maintenance
These final steps lock in your hard work, ensuring a beautiful and durable driveway.
Step 7: Final Steps in How to Install a Block Paving Driveway
- First Compaction Pass with a Plate Compactor: Once all blocks are laid and cut, make an initial pass over the entire driveway with your plate compactor. For textured or delicate blocks, attach a rubber mat to the compactor to prevent damage. This first pass begins to settle the blocks into the sand bed.
- Spreading Kiln-Dried Sand: Generously spread kiln-dried sand over the entire surface. This fine, dry sand is designed to flow easily into the joints.
- Sweeping Sand into All Joints: Using a stiff broom, sweep the sand back and forth, working it diligently into every joint until they are completely filled.
- Final Compaction to Lock Pavers: Once the joints are filled, perform a final series of compaction passes (4-6, in perpendicular directions). This process “interlocks” the blocks, locking them together and transferring loads evenly across the surface. Complete compaction within 1m of unrestrained edges daily.
- Topping Up Sand as Needed: As compaction settles the blocks and sand, some joints may need more. Repeat the process of spreading and sweeping sand, followed by compaction, until all joints remain full and stable. Brush off any excess sand.
Potential Issues and How to Resolve Them
Even with the best intentions, issues can arise. Here’s how to approach common problems:
- Efflorescence: This white, powdery deposit on new blocks is a natural phenomenon caused by salts leaching from the concrete. It typically weathers away naturally within 12-18 months. Avoid sealing too early, as this can trap the efflorescence.
- Weed Growth in Joints: Airborne seeds can land in the jointing sand. Regular sweeping helps prevent this. For existing weeds, use a weed killer designed for paving or use a sand stabilizer during installation.
- Sinking or Movement: This usually indicates inadequate sub-base preparation or poor drainage. Small areas can be repaired by lifting the affected blocks and re-leveling the bedding sand. Widespread sinking may require a professional assessment.
- Staining from Oil or Rust: Act quickly. For oil, absorb as much as possible with cat litter, then use a specialized oil stain remover. Rust stains often require a specific rust remover. Always test cleaning products on an inconspicuous area first.
Essential Maintenance for Longevity
A block paved driveway is durable, but a little care goes a long way.
- Regular Sweeping: This is the simplest and most effective maintenance task. It prevents the build-up of organic matter that encourages weed growth. For permeable driveways, it also keeps the joints from clogging.
- Removing Stains Promptly: Addressing spills quickly minimizes their impact.
- Topping Up Joint Sand Annually: Over time, jointing sand may wash out. Check the joints annually, especially during the first year, and top up with kiln-dried sand as needed.
- Gentle Pressure Washing: Excessive pressure can dislodge jointing sand. If you pressure wash, use a fan nozzle at a low setting and work carefully.
- When to Consider Sealing: We advise waiting 12-18 months after installation before sealing. This allows any efflorescence to weather away. A good sealant can then protect against stains, improve color, and inhibit weed growth.
Frequently Asked Questions about Block Paving Installation
What is the most common mistake when installing block paving?
The most common mistake when learning how to install a block paving driveway is inadequate sub-base preparation. Underestimating the critical role of the sub-base by not excavating deep enough, using the wrong material, or not compacting it thoroughly will lead to an unstable foundation. As a result, the driveway will inevitably sink, rut, or shift. Poor compaction and incorrect drainage fall are also critical errors. The sub-base is the hero; if it’s not robust, the entire project is compromised.
How long does a properly installed block paved driveway last?
A block paved driveway, when installed correctly with proper sub-base preparation and drainage, can last for over 20 years, and many exceed 30 years with proper maintenance. Longevity is a direct reflection of the quality of the groundwork, materials used, traffic levels, and consistent maintenance. A key benefit of block paving is that individual blocks can be replaced if damaged, further extending the driveway’s life.
Can I lay block paving directly onto an existing concrete or tarmac driveway?
We do not recommend laying block paving directly onto an existing concrete or tarmac driveway. This approach can lead to several issues:
- Final Height: It will raise the driveway’s finished height, potentially creating problems with damp-proof courses, garage doors, or pathways.
- Drainage: The existing surface may not have the correct falls, and adding layers can worsen ponding or direct water incorrectly.
- Stability: The integrity of the existing surface is unknown. Cracks or movement in the underlying layer will eventually transfer to your new paving, causing it to fail.
- Sub-Base Integrity: You lose the opportunity to create a proper, compacted sub-base designed for block paving, which is crucial for long-term stability.
The correct method is to fully excavate the old surface and build a new sub-base from scratch to ensure a durable, problem-free driveway.
Conclusion: Your Professional Driveway Awaits
We’ve journeyed through the intricate process of how to install a block paving driveway, from the initial spark of design inspiration to the final sweep of jointing sand. We’ve seen that success hinges on four critical pillars: Meticulous Planning, building a Solid Foundation, ensuring Precise Laying, and applying those all-important Professional Finishing touches.
While undertaking a DIY block paving project can be incredibly rewarding, offering the satisfaction of changing your home with your own hands, we understand that it’s a significant undertaking. The expertise required for perfect levels, precise cuts, and robust compaction can be challenging to master for even the most enthusiastic DIYer.
For a flawless finish and guaranteed longevity, especially for a key feature like your driveway, consider professional Hardscape Installation. At TMI Minnesota, our experts use leading-edge products and proven techniques to create stunning and durable outdoor spaces that stand the test of time, elevating your yard living. We’re passionate about bringing your vision to life with unparalleled craftsmanship.
Ready to envision your dream driveway? Browse our Block Paving Driveway Designs for inspiration. Or, if you’re in the Twin Cities area and prefer the peace of mind that comes with professional installation, don’t hesitate to Contact Us today for a consultation. Let us turn your driveway dreams into a beautiful, lasting reality.