
What is Hardscape Installation: The Foundation of Outdoor Living
What is hardscape installation? It refers to the process of constructing non-living elements in your landscape using materials like stone, concrete, brick, and wood to create permanent structures such as patios, walkways, retaining walls, and outdoor kitchens.
Here’s a quick overview of hardscape installation:
- Definition: The construction of non-living, permanent landscape features using durable materials
- Common Elements: Patios, walkways, driveways, retaining walls, fire pits, outdoor kitchens
- Materials Used: Concrete pavers, natural stone, brick, wood, gravel
- Benefits: Increases usable outdoor space, boosts property value, reduces maintenance, controls erosion
- Installation Order: Always installed before softscape (plants, grass, mulch)
Hardscape elements form the backbone of your outdoor living space, creating structure, function, and flow. Unlike softscape (plants, trees, and grass), hardscape features are permanent installations that define how you use your yard while requiring minimal maintenance over time. When properly installed, these elements can transform previously unusable areas into beautiful, functional spaces for entertaining, relaxing, and enjoying the outdoors year-round.
I’m Christopher Deanovic, Operations Leader at Task Masters, and I’ve overseen countless hardscape installation projects throughout Minnesota, helping homeowners create outdoor spaces that balance beauty with functionality. My experience with what is hardscape installation spans everything from simple paver patios to complex multi-level outdoor living spaces with integrated lighting, water features, and custom stonework.

Important what is hardscape installation terms:
– Retaining wall design services
– Garden lighting installation
– Landscape irrigation solutions
What Is Hardscape Installation?
Have you ever noticed how some yards just seem to work better than others? That’s often because of thoughtful hardscape installation. Think of hardscape as the backbone of your outdoor space – it’s all those permanent, non-living elements that create structure and function in your landscape.
While your flowers and shrubs bring seasonal color and life, your hardscape elements provide year-round functionality and define how you actually use your outdoor space. As Minnesota homeowners ourselves, we understand that our unique climate demands hardscape solutions that can withstand everything from summer heat to winter’s deep freeze.
| Hardscape | Softscape |
|---|---|
| Non-living elements (stone, concrete, brick) | Living elements (plants, trees, grass, flowers) |
| Permanent structures | Grows, changes seasonally |
| Low maintenance | Requires regular care |
| Controls erosion and water flow | Absorbs water, prevents runoff |
| Examples: patios, walkways, retaining walls | Examples: lawns, gardens, shrubs, trees |
| Installed first in landscape projects | Installed after hardscape elements |
| Provides structure and function | Provides color, texture, and scent |
Defining what is hardscape installation in modern landscaping
What is hardscape installation in today’s world? It’s become so much more than just pouring a concrete slab! Modern hardscape creates the foundation of your outdoor living experience through thoughtfully designed solid surfaces and structural elements.
Your patio isn’t just a place to put furniture – it’s an outdoor living room where memories are made. Your walkways don’t just connect point A to point B – they guide visitors through your landscape’s story. Your retaining wall isn’t just holding back soil – it’s creating usable space on a sloped yard while adding visual interest.
Today’s hardscape elements include beautiful patios and decks for entertaining, functional walkways that guide movement, driveways that make a statement, retaining walls that solve elevation challenges, cozy fire features that extend Minnesota’s outdoor season, soothing water features, fully-equipped outdoor kitchens, and shade structures like pergolas that define outdoor “rooms.”
The best part? These elements effectively expand your home’s living space into the outdoors, giving you more room to live, play and entertain.
How what is hardscape installation differs from softscape
Understanding what is hardscape installation means appreciating how it contrasts with softscape. Think of it this way: if hardscape is the “bones” of your landscape, softscape is the “skin and clothing.”
Your paver patio stays put while your nearby flower garden transforms through the seasons. Your stone wall remains steadfast as the vines growing over it expand and contract. This permanence versus growth is the most fundamental difference between the two.
The maintenance needs couldn’t be more different either. Your hardscape might need occasional cleaning and sealing every few years, while your plants demand regular watering, pruning, feeding, and seasonal attention. For busy homeowners, finding the right balance between hardscape and softscape often means finding the right balance in your maintenance schedule too.
Timing matters as well. We always install hardscape elements first in any landscape project. You wouldn’t put your furniture in before building your house, right? The same principle applies outdoors – hardscape creates the framework that softscape elements will later complement.
Water management represents another crucial difference. Your patio directs water away from your home’s foundation, while your lawn and garden beds absorb it. A thoughtfully designed landscape needs both working in harmony to properly manage Minnesota’s rain and snowmelt.
As we often tell our clients: “Your hardscape is what you live on; your softscape is what you live with.” When they work together in harmony, that’s when outdoor magic happens.
Planning & Preparation for a Successful Hardscape Project
The magic of a stunning patio or neat walkway doesn’t happen by accident. The real secret to hardscape success happens long before the first paver is placed. Let’s walk through how to set your project up for success from day one.

When I’m chatting with homeowners about what is hardscape installation, I always emphasize that preparation is where professionals truly earn their keep. It’s like baking a cake – the foundation determines everything that follows.
Site Analysis and Assessment
Think of your yard as a living, breathing entity with its own personality. Before we design anything, we need to understand what we’re working with:
Your yard’s natural slopes tell us how water moves across your property – crucial information for preventing pooling or erosion issues later. We’ll examine your soil to determine if it’s clay-heavy (common in parts of Minnesota) or sandy, which affects how we build your base.
We’ll also map out existing trees, structures, and other features you want to preserve. I’ve seen too many beautiful mature trees damaged during construction because nobody thought ahead! We’ll track sun patterns throughout the day (that perfect sunny spot at 10am might be sweltering by 2pm), and identify views worth highlighting or screening.
Finally, we’ll observe how you naturally move through your space. The most beautiful patio in the world won’t get used if it’s awkwardly placed!
Utility Location and Safety
Here’s a story I’ll never forget: A homeowner decided to skip calling 811 before digging for his new patio. Three hours into the project, he struck a gas line. The entire neighborhood had to evacuate while emergency crews handled the situation.
Don’t be that guy! Always:
- Call 811 at least 3 business days before your project begins
- Wait patiently for utility companies to mark their lines
- Respect those colorful markings when planning your design
It takes just one call to potentially save lives, prevent service disruptions, and avoid hefty fines. As we say in Minnesota, “Know what’s below, call before you dig” – especially with our complex network of utilities.
Design Considerations
This is where dreams meet reality. When designing your hardscape, we’ll balance what you want with what your space needs:
Will you host summer barbecues or intimate evening gatherings? Do you need space for kids to play? How will people naturally flow through your yard? Your what is hardscape installation plan should reflect how you actually live.
We’ll ensure the scale fits your home – an oversized patio can make a modest home look smaller, while a tiny patio beside a large home feels disproportionate. We’ll select materials that complement your home’s architecture and withstand our challenging Minnesota winters.
And of course, we’ll work within your budget. Sometimes phasing a project over several years makes more sense than compromising on quality. Our Hardscape Design Services include detailed 3D renderings so you can “walk through” your new space before we break ground.
Tools & Materials Checklist
Whether you’re a DIY warrior or just want to understand what we’ll be using on your project, here’s what goes into a typical hardscape installation:
The pros at TMI Minnesota arrive with everything from basic measuring tapes and string lines to specialized plate compactors and concrete saws. Safety gear is non-negotiable – gloves, eye protection, ear protection, and dust masks protect our team every day.
Material-wise, we’re looking at layers: geotextile fabric (in certain conditions), crushed stone base, bedding sand, your chosen surface materials (pavers, natural stone, etc.), edge restraints, and joint fillers like polymeric sand. For equipment like plate compactors, homeowners can find rentals at places like Harbor Freight if tackling smaller DIY projects.

Ensuring Proper Drainage & Foundation
If there’s one thing I’ve learned in my years of installing hardscapes in Minnesota, it’s that water and frost are the enemies of longevity. Our freeze-thaw cycles can wreak havoc on improperly installed hardscapes.
Good drainage is non-negotiable. We design with a minimum 1-2% slope away from your home (about ¼ inch per foot) to prevent water from pooling or running toward your foundation. In problem areas, we might incorporate drain tiles, channels, or even design attractive dry creek beds that serve a dual purpose.
As for your foundation, depth matters in Minnesota more than warmer climates. We typically excavate 8-12 inches for walkways and patios, and 12-14 inches for driveways that will bear vehicle weight. Frost can penetrate up to 4 feet deep in our region!
We install base material in “lifts” – layers of 2-3 inches that we compact thoroughly before adding the next. This methodical approach prevents settling later. Finally, a perfectly level 1-inch sand bed creates the ideal setting surface for your pavers or stones.
I’ve seen beautiful but poorly-based patios heave and shift after just one winter, while properly installed hardscapes last decades. When it comes to what is hardscape installation, the parts you don’t see matter most.
For more inspiration on balancing hardscape with softscape elements, check out this helpful Garden Guide: The Difference Between Hardscape and Softscape that many of our clients find illuminating.
Step-by-Step Hardscape Installation Process
Rolling up your sleeves for a hardscape project can be incredibly rewarding. Let me walk you through how we tackle paver patios and walkways here in Minnesota, where our unique climate demands special attention to detail.
Key Steps Snapshot
The journey from dirt to dream patio follows a rhythm that’s almost like a dance. First, we mark and measure the area with stakes and string, making sure corners are square and utilities are marked. This simple step saves countless headaches down the road!
Next comes the excavation – digging down 8-12 inches for most Minnesota projects. I always tell homeowners to remember that what goes underneath your pavers matters more than the pavers themselves. You’re essentially building an iceberg, with the beautiful top supported by a solid foundation below.
Once the area is excavated, we add crushed stone base material in thin layers, typically 2-3 inches at a time. Each layer gets thoroughly compacted before adding the next. The sound of the plate compactor might annoy the neighbors temporarily, but it’s the soundtrack of a patio that won’t shift or sink later!

After the base is solid (and I mean solid – you should be able to walk on it without leaving footprints), we spread bedding sand in a perfect 1-inch layer. We use screed pipes and a straight board to get this layer perfectly level – this is where your patience really pays off.
Now for the fun part – laying the pavers! Starting from a fixed corner, we place each paver in the chosen pattern, using a rubber mallet to nestle them into the sand. For edges and curves, we cut pavers with a concrete saw or splitter. There’s something satisfying about seeing the pattern emerge row by row.
Edge restraints are critical – they’re like the picture frame that holds everything together. Without them, your beautiful paver pattern will eventually spread and shift. We either install these before the pavers or after, depending on the specific project requirements.
Once all pavers are in place, we run the plate compactor over the surface again (with a rubber pad to protect the pavers). This settles everything nicely into the bedding sand. Then we apply polymeric sand, sweeping it into the joints and misting with water to activate the binding agents. This step transforms individual pavers into a unified surface.
Finally, we clean and seal the finished project. While sealing is optional, it improves colors and provides protection against stains and weather – something worth considering in our Minnesota climate!
Common Mistakes to Avoid
After installing hundreds of hardscape projects across Minnesota, I’ve seen plenty of DIY attempts that didn’t quite work out. The most common misstep? Inadequate base preparation. When homeowners try to save time or money by skimping on base depth or compaction, they end up with a wavy, sinking patio after just one freeze-thaw cycle.
Poor drainage planning is another frequent issue. Water always wins – if you don’t plan for it to flow away from your home, it will find ways to create problems. Even beautiful patios need to slope away from structures (about 1/4 inch per foot).
Many DIYers also forget about edge restraints or install them improperly. Without this crucial element, pavers spread outward over time, creating gaps and an uneven surface. It’s like building a bookshelf without ends – eventually, everything slides out!
I’ve seen plenty of improper cutting attempts too. Using the wrong tools for cutting pavers can result in broken materials and a jagged, unprofessional appearance. Investing in the right cutting tools (or renting them) makes a world of difference.
Perhaps the most common mistake is simply rushing the process. Hardscape installation rewards patience and attention to detail. When you rush through critical steps like proper compaction or accurate leveling, the results always show.
Incorrect joint sand application can also cause headaches. Polymeric sand needs to be applied according to manufacturer instructions – otherwise, you might end up with staining or joints that fail to properly harden.
For larger installations, forgetting to include expansion joints can lead to cracking as the materials naturally expand and contract with temperature changes.
Want more detailed guidance on paver installation specifically? Check out our comprehensive guide on How to Install Hardscape Pavers for step-by-step instructions custom to Minnesota conditions.
Understanding what is hardscape installation involves appreciating both the visible beauty and the invisible engineering that makes it last through our challenging seasons. The best hardscapes look simple but are built with careful attention to every detail beneath the surface.
Designing for Integration: Blending Hardscape & Softscape
The magic happens when hardscape and softscape elements come together in perfect harmony. It’s like orchestrating a beautiful dance between the permanent and the living elements of your landscape – when done right, the result is simply breathtaking.
Creating a Cohesive Design
When I work with homeowners in the Twin Cities, I always emphasize that balance is everything. Think of your yard as a painting where both the canvas and the colors matter equally.
Your hardscape provides the structure – the bones of your outdoor space – while your plants bring life, movement, and seasonal change. Finding the right proportion between these elements is crucial. Too much concrete and stone can make your yard feel like a parking lot, while too many plants without defined spaces limits how you can actually use your outdoor areas.
Color harmony plays a huge role in creating that seamless look. I love helping homeowners select pavers and stones that complement both their home’s exterior and their preferred plant palette. There’s something magical about warm-toned sandstone pavers paired with ornamental grasses that pick up those same golden hues in the fall.
Texture is another powerful design tool. The contrast between smooth hardscape surfaces and varied plant textures creates visual interest that draws the eye. Imagine running your hand along a sleek stone wall, then reaching out to touch the feathery softness of ornamental grasses swaying nearby – that’s the kind of sensory experience we aim to create.

Climate-Smart Choices for Minnesota
Living in Minnesota means designing with our unique climate in mind. Our winters are long, so what is hardscape installation needs to account for both beauty and practicality year-round.
I always recommend incorporating evergreen plants and architectural hardscape elements that maintain visual interest even when covered with a dusting of snow. There’s nothing quite like seeing the structure of a well-designed retaining wall highlighted by fresh snowfall.
Snow management is a practical consideration we can’t ignore. When designing patios and walkways, we need to think about where that snow will go when you’re shoveling. Having adequate space for snow piling that won’t damage your favorite shrubs is essential planning that many homeowners overlook.
If you’ve lived through a Minnesota winter, you know about salt and de-icers. Near driveways and walkways, we select salt-tolerant plants that can handle the occasional splash of ice melt without turning brown and crispy.
Our freeze-thaw cycles are legendary, which is why properly installed pavers are such a great choice for our climate. Unlike poured concrete that can crack, a well-installed paver system has built-in flexibility to move slightly with the ground without breaking.
Trending Hardscape Features
The outdoor living trend is booming in the Twin Cities, and for good reason – we Minnesotans love to make the most of our beautiful summer months! Some of the most popular features we’re installing include:
Outdoor living rooms have become the new must-have, complete with comfortable seating, fire features, and outdoor rugs that make your patio feel like an extension of your home. These spaces blur the line between indoors and outdoors, creating cozy gathering spots for family and friends.
Outdoor kitchens range from simple grilling stations to elaborate cooking areas with all the amenities of an indoor kitchen. There’s something special about preparing a meal outside while your guests relax nearby with a cold beverage.
Fire features extend our outdoor living season significantly. A well-designed fire pit or fireplace lets you enjoy your outdoor space well into those crisp fall evenings and earlier in spring than you might expect.
For inspiration on blending hardscape and softscape elements, check out our Softscaping and Hardscaping page or visit the Pinterest Inspiration Gallery for ideas that might spark your imagination.
Hardscape + Lighting + Accessories
The integration story doesn’t end with plants and pavers. Let’s talk about the elements that truly bring your outdoor space to life after the sun goes down.
Landscape lighting transforms your hardscape features at night, creating an entirely different experience. Path lights guide your way safely while wall-mounted fixtures can highlight the beautiful texture of a stone wall. In-paver lights add a magical glow to walkways and patios. The right lighting not only improves safety but creates an ambiance that makes evening gatherings special.
I always encourage homeowners to think about furniture zoning – creating different functional areas within your hardscape. A dining area with a table and chairs, a conversation area with comfortable seating around a fire pit, maybe a quiet reading nook tucked into a corner of the patio. These distinct zones help define how you’ll use your outdoor space.
Decorative containers and planters are perfect for adding splashes of color and softscape elements directly onto hardscape surfaces. They’re also great for areas where in-ground planting isn’t possible, like on a deck or balcony.
Don’t forget about shade! In our hot summer months, pergolas, awnings, and shade sails provide welcome relief from the sun and create a sense of enclosure that makes outdoor spaces feel more intimate and room-like.
For more details on enhancing your hardscape with lighting, check out our guide on How to Install Hardscape Lighting.
When you’re ready to create your perfect blend of hardscape and softscape, our team at TMI Minnesota would love to help bring your vision to life. After all, the best outdoor spaces aren’t just built – they’re carefully composed to reflect your lifestyle and improve your home’s unique character.
Maintenance, Cost & Long-Term Value
One of the best things about adding hardscape to your yard? Once it’s installed, you won’t be spending every weekend maintaining it like you would with a lawn. That said, your beautiful stone patio or retaining wall isn’t completely “set it and forget it” — a little care goes a long way toward keeping it looking great for decades.
Maintenance Schedule
Here in Minnesota, our seasonal extremes mean your hardscape needs attention at specific times of year:
Spring is inspection time. After the snow melts, take a walk around and look for any pavers that shifted during freeze-thaw cycles. This is also when you’ll want to sweep in fresh polymeric sand if winter took its toll on your joints.
Summer maintenance is pretty simple — just keep an eye out for any weeds trying to establish themselves between pavers, and remove them before they take hold. A quick spray with the hose or a gentle pressure washing keeps everything looking fresh during barbecue season.
Fall is all about preparation. Clear leaves and debris from any drainage channels before they can freeze in place, and make sure water has clear paths to flow away from your hardscape.
Winter brings snow removal concerns. Invest in a plastic snow shovel rather than metal ones that can scratch or chip your beautiful pavers. If you use ice melt, choose products that won’t damage your specific hardscape materials.

I always tell my clients that a little annual TLC keeps major repairs at bay. A yearly pressure washing (with appropriate pressure for your specific material) and checking edge restraints for damage pays dividends. Every 2-3 years, consider reapplying sealer to maintain that “just-installed” look and provide protection against stains and UV damage.
Cost Considerations
Let’s talk dollars and cents. What is hardscape installation going to cost you? The honest answer is: it varies widely based on materials, complexity, and whether you’re hiring professionals or tackling it yourself.
For material costs alone (per square foot), expect to pay:
– Concrete pavers: $8-15
– Natural stone: $15-30
– Brick: $10-20
– Gravel: $1-5
When you hire professionals like our team at TMI Minnesota, installation typically adds $10-20 per square foot depending on site conditions and project complexity. While that might seem like a significant investment upfront, consider the long-term value:
Your property value typically increases by 10-20% with professional hardscape installation. That patio isn’t just a place to put your grill—it’s an investment that pays dividends when it’s time to sell.
Plus, think about the extended living space you’re gaining. That new outdoor living room effectively adds square footage to your home at a fraction of what an indoor addition would cost. And unlike a deck that needs regular staining and board replacements, a properly installed paver patio can last decades with minimal maintenance costs.
For specific elements like retaining walls that require structural expertise, check out our Retaining Wall Design Services page to learn more about options and considerations.
DIY vs Hiring a Pro
I’m often asked whether homeowners should tackle hardscape projects themselves or hire professionals. The honest answer depends on several factors:
If you’re considering DIY, be realistic about your skill level. While a simple stepping stone path might be weekend-warrior territory, a multi-level patio with built-in fire pit probably isn’t. You’ll also need specialized tools—that plate compactor rental alone can run $75-100 per day, and proper installation might require several days of compaction.
Time is another consideration. What our experienced crews can accomplish in days might take you weeks of evenings and weekends. There’s also the physical demand—those pavers aren’t light, and proper base preparation involves moving literal tons of material.
The benefits of hiring professionals go beyond just saving your back. You get our expertise from hundreds of similar projects, efficient completion with professional equipment, and perhaps most importantly, a warranty against installation-related issues. When spring frost heave comes around, knowing your patio is covered gives serious peace of mind.
For complex projects—especially anything involving significant elevation changes or retaining walls over 4 feet—professional installation isn’t just convenient, it’s crucial for safety and longevity.

Frequently Asked Questions about Hardscape Installation
What base depth do I need for a patio in freeze-thaw climates?
Living in Minnesota means dealing with some serious freeze-thaw cycles that can wreak havoc on poorly installed hardscapes. That’s why we always recommend going deeper than you might think necessary. For patios and walkways, you’ll want at least 6-8 inches of properly compacted crushed stone as your base. For driveways that will bear vehicle weight, bump that up to 10-12 inches minimum.
Your total excavation depth needs to account for this base layer plus your 1-inch bedding sand layer and the thickness of your pavers themselves. It might seem like overkill when you’re digging, but trust me—I’ve seen too many beautiful patios turn into wavy, uneven messes after just one winter because someone tried to cut corners on base depth.
Can permeable pavers solve drainage issues in my yard?
Permeable pavers can be fantastic for managing water in your landscape, but I like to think of them as one tool in your drainage toolbox, not a magic wand. These specially designed pavers allow water to filter through their joints into a base designed for temporary water storage and gradual soil infiltration.
They work beautifully in areas with naturally well-draining soils. However, in many Twin Cities neighborhoods where clay soil dominates, permeable pavers may need some additional engineering help. For serious drainage headaches, you’ll likely need a comprehensive approach—perhaps combining permeable pavers with drain tile, thoughtfully designed swales, or strategically placed rain gardens.
What I love about permeable pavers is that they’re not just practical—they’re also beautiful and environmentally friendly, reducing runoff and helping replenish groundwater naturally.
How long should I wait before sealing new hardscape surfaces?
Patience pays off when it comes to sealing your new hardscape. For concrete pavers, we typically tell our clients to wait at least 60-90 days before applying sealer. This waiting period allows efflorescence—that whitish, powdery deposit that naturally forms on new concrete products—to emerge so you can clean it off before sealing.
For natural stone, the timeline varies depending on the specific stone type and sealer you’re using. The golden rule here is making sure your stone is thoroughly clean and completely dry before sealing. Always check the sealer manufacturer’s specific recommendations—they’ve tested their products extensively and know what works best.
I’ve seen eager homeowners seal too early only to trap efflorescence under the sealer, creating a cloudy appearance that’s difficult to remedy. Those extra weeks of patience make all the difference in your final result.
What’s the best way to prevent weeds in paver joints?
Nothing ruins the clean look of a beautiful paver patio faster than weeds popping up between the joints! The good news is that with a multi-layered approach, you can keep those unwanted plants at bay.
Start with proper installation fundamentals—we always use geotextile fabric under the base material to create a weed barrier from below. Then, polymeric sand is your best friend for filling joints. This special sand hardens when wet, creating a solid barrier that inhibits weed growth while still allowing for the natural expansion and contraction of your pavers.
Applying a quality sealer over the entire surface adds another layer of protection. If the occasional determined weed does appear, prompt removal is key before it can establish deep roots. For ongoing maintenance, consider periodic treatments with environmentally friendly weed preventers rather than harsh chemicals.
With this approach, you’ll spend your time enjoying your outdoor space rather than playing whack-a-mole with persistent weeds.
How do I fix a paver patio that has settled in one area?
One of the biggest advantages of choosing pavers over poured concrete is the ability to make repairs that leave no evidence there was ever a problem. If you notice a depression forming in one area of your patio, don’t worry—it’s a relatively straightforward fix.
First, carefully remove the pavers from the settled area, plus several rows beyond to create a gradual transition. Then add and thoroughly compact additional base material to bring the low spot back up to proper grade. Re-screed a fresh layer of bedding sand, reinstall your pavers, and finish with fresh polymeric sand in the joints. After compaction and sealing, your patio will look good as new!
This repair process is why we often recommend pavers to our Minnesota clients—with our freeze-thaw cycles, some ground movement is almost inevitable over time. Unlike concrete slabs that would crack or require complete replacement, pavers can be lifted, adjusted, and reset with no visible evidence of repair.
Conclusion & Next Steps
What is hardscape installation? Throughout this guide, we’ve finded it’s far more than just placing pavers or building walls. It’s about creating the framework for your outdoor lifestyle—crafting spaces where birthday parties will be celebrated, quiet morning coffees will be enjoyed, and summer evenings will be spent with friends around a fire pit.
When thoughtfully designed and properly installed, hardscape elements transform your property in meaningful ways that improve both daily life and long-term value. They extend your usable living space beyond your home’s walls, creating outdoor “rooms” that serve different purposes. They significantly boost your property’s market value—often returning 10-20% on your investment. They drastically reduce the time you’ll spend on yard maintenance compared to all-green spaces. And they solve practical challenges like erosion, poor drainage, and uneven terrain that might otherwise limit how you use your yard.
The principles we’ve shared apply whether you’re planning a simple garden path or dreaming of a complete outdoor oasis. Success always comes down to careful planning, thorough site preparation, quality materials, and meticulous installation techniques. Skipping any of these steps might save time initially but will inevitably lead to disappointment down the road.
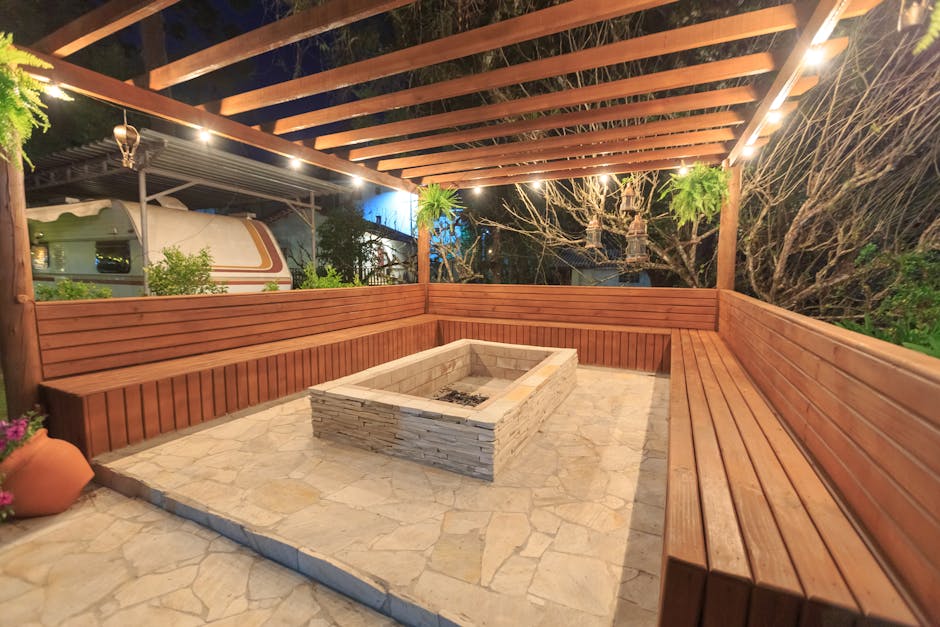
Here at TMI Minnesota, we understand Minnesota’s unique challenges—from our dramatic freeze-thaw cycles to our clay-heavy soils. Our team specializes in creating custom hardscape installations throughout the Twin Cities that balance beauty with rugged durability. We believe your outdoor space should work as good as it looks, and last for decades with minimal upkeep.
If you’re feeling inspired to transform your own outdoor space, I’d encourage you to browse our Hardscape Gallery for real-world examples of what’s possible. You might be surprised at how even modest hardscape additions can dramatically improve your outdoor living experience.
Proper maintenance will protect your investment and keep your hardscape looking fresh for years to come. The simple seasonal maintenance schedule we outlined will help ensure your patios, walls, and walkways continue to perform beautifully through our challenging Minnesota seasons.
Your outdoor space should feel like a natural extension of your home—a place that reflects your personal style and supports the way you want to live. With thoughtful hardscape installation as your foundation, you can create an outdoor environment that brings joy and functionality to your daily life for many years to come.