
Illuminating Your Outdoor Space
Landscape lighting ideas can transform your home’s exterior from ordinary to extraordinary, extending your living space and enhancing security after dark. Here are the most popular landscape lighting approaches at a glance:
- Path lights – Place 10-15 feet apart along walkways for safe navigation
- Uplighting – Position fixtures 18-24 inches from tree trunks to create dramatic shadows
- String lights – Hang over patios, decks or pergolas for instant ambiance
- Well lights – Install flush with ground to highlight features without visible fixtures
- Downlighting – Mount in trees to create natural “moonlight” effects below
- Step lights – Integrate into staircases for both safety and visual interest
- Spotlights – Use narrow beams to highlight specific architectural elements
- Wash lights – Create soft, diffused illumination across walls and large surfaces
Your landscape deserves thoughtful illumination that balances beauty, function, and energy efficiency. A well-designed lighting plan not only showcases your property’s best features but also deters intruders, prevents accidents, and creates inviting outdoor rooms for evening enjoyment.
Modern LED landscape lighting uses up to 85% less energy than traditional systems while offering greater flexibility in design. Whether you’re looking to highlight mature trees, define pathways, or create a magical backyard retreat, the right lighting approach can dramatically transform how you experience your outdoor spaces after sunset.
I’m Christopher Deanovic, Operations Leader at Task Masters, where I’ve helped countless Minnesota homeowners implement stunning landscape lighting ideas that improve both the beauty and functionality of their properties. My experience has taught me that the most successful outdoor lighting designs thoughtfully layer different lighting techniques to create depth, drama, and practical illumination.

Landscape lighting ideas terms you need:
– outdoor fire feature ideas
– garden pathway ideas
– outdoor living upgrades
Why Landscape Lighting Matters
As the Minnesota sun dips below the horizon, your outdoor space doesn’t have to fade into darkness. A thoughtfully designed landscape lighting system keeps your property’s beauty on display while delivering benefits that extend far beyond mere aesthetics.
Improved Security and Safety
Let’s face it—a well-lit property simply isn’t appealing to those with bad intentions. Research shows that proper outdoor lighting can reduce break-ins by up to 39%, making it one of the most effective passive security measures available. But it’s not just about keeping unwanted visitors away. Those same lights prevent twisted ankles and skinned knees by illuminating potential hazards like steps, uneven walkways, and pool edges that family and friends might otherwise miss in the darkness.
Increased Property Value
Want to boost your home’s market appeal? Landscape lighting ideas can increase property values by 10-20% by creating that all-important “wow factor.” When potential buyers drive by your home in the evening hours, strategic lighting creates a memorable first impression that sets your property apart. It’s one of those rare home improvements that offers both immediate enjoyment and long-term financial return.
Extended Outdoor Living
We Minnesotans know our outdoor season is precious. Why limit your patio, deck, or garden enjoyment to daylight hours? With the right lighting approach, your backyard becomes an inviting retreat long after sunset. Picture yourself relaxing with friends around the fire pit, enjoying late dinner on the patio, or simply unwinding with a book in your outdoor living room—all made possible by thoughtful illumination that extends your usable outdoor hours.
Energy Efficiency
Today’s LED technology has revolutionized landscape lighting. Modern fixtures use up to 85% less energy than their halogen predecessors while lasting up to 40,000 hours—that’s roughly 20 years of regular use compared to just two years for traditional bulbs. This dramatic reduction in both energy consumption and maintenance frequency translates to significant savings over time, making landscape lighting more affordable than ever.
Environmental Considerations
Being good stewards of our natural environment means thinking beyond our property lines. Thoughtful lighting design considers wildlife impact by avoiding excessive upward light that can disrupt nocturnal creatures like bats, owls, and beneficial insects. At TMI Minnesota, we recommend using timers to create dark periods and carefully positioning fixtures to minimize light pollution while still achieving your aesthetic and functional goals.
Ready to explore how landscape lighting ideas can transform your property? Check out Commonwealth Landscape Lighting’s tip guide for additional inspiration, or contact our team to discuss how we can illuminate your outdoor living vision.
15 Brilliant Landscape Lighting Ideas
Let’s explore specific landscape lighting ideas that can transform your Twin Cities property into a nighttime showpiece:
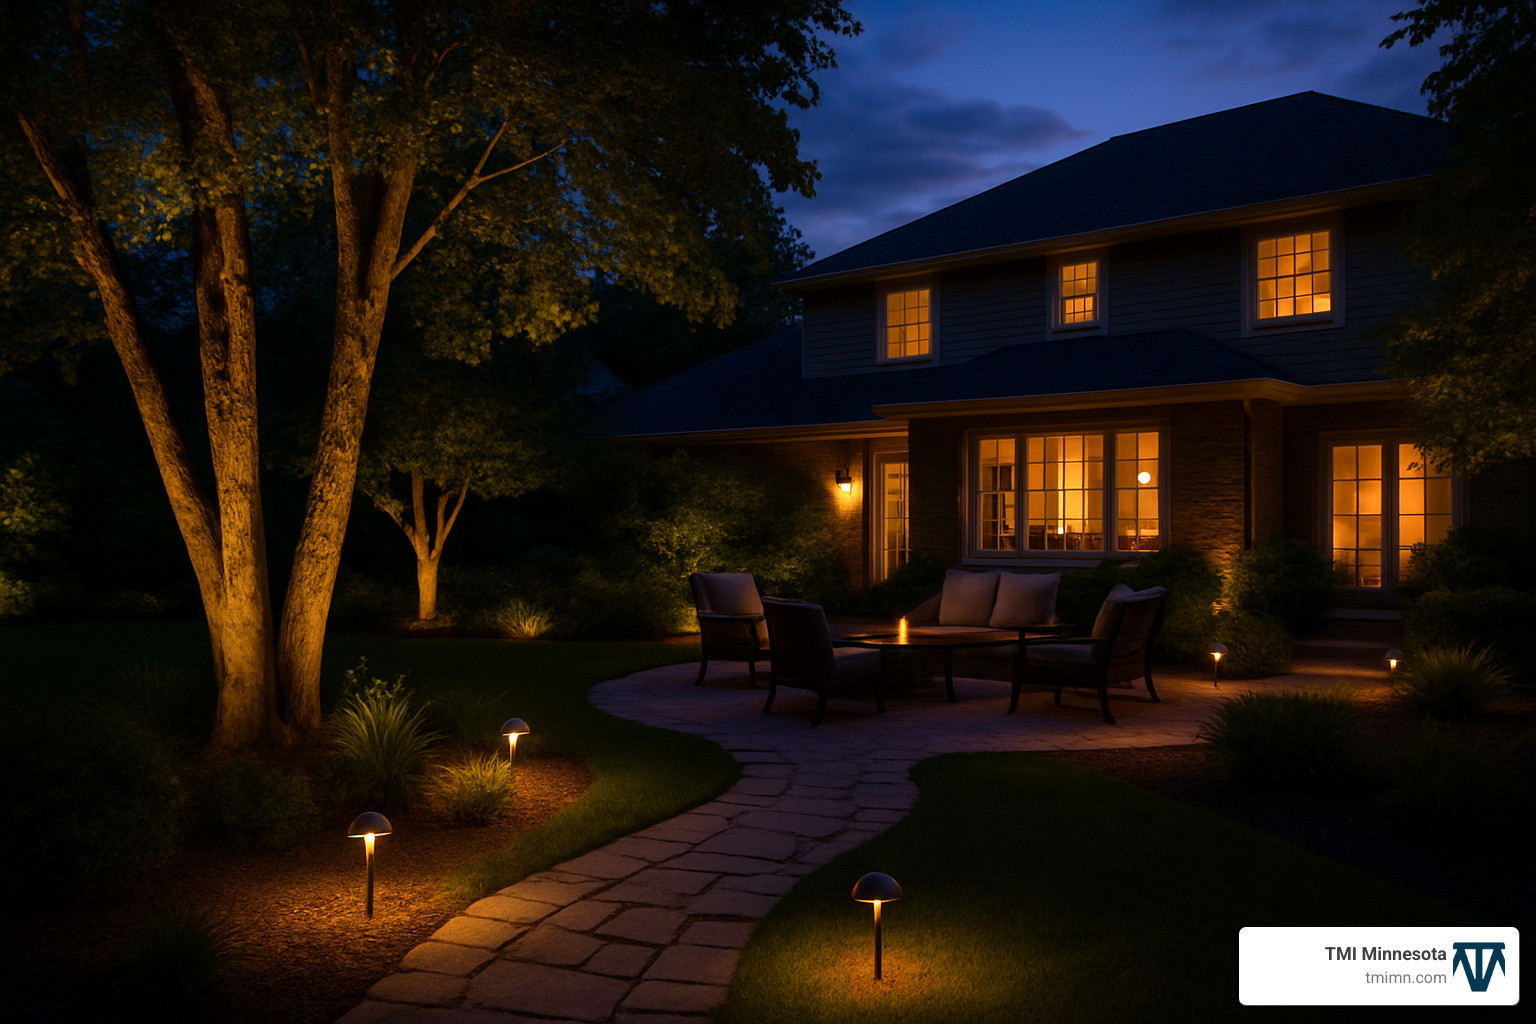
Pathway Glow: Landscape Lighting Ideas for Walkways
There’s something magical about a well-lit pathway welcoming you home. Beyond just preventing stumbles in the dark, thoughtful path lighting creates an inviting journey through your landscape.
Traditional path lights work beautifully when spaced about 10-15 feet apart. If you’re going the solar route (which we often recommend for DIY projects), you’ll want to place them closer together—about 6-8 feet—since they typically produce softer illumination.
Want to break away from the “airport runway” look? Try staggering your lights on alternating sides of the walkway. This creates a more natural, flowing appearance that guides the eye forward. For wider paths or to make more of a daytime statement, consider bollard lights. These sturdy fixtures provide broader illumination and add architectural interest even when they’re not lit.
For the minimalists among us, flush-mount lights that sit level with your pathway surface offer subtle guidance without interrupting your landscape’s clean lines. And if you have mature trees nearby, consider the neat approach of downlighting from their branches, creating nature’s own version of moonlight to guide your steps.
Whatever style you choose, remember to coordinate the finish with your home’s exterior fixtures—copper, brass, bronze, or matte black—for a cohesive look that feels intentional rather than afterthought. For more detailed guidance on pathway installation, check out our garden lighting installation guide.
Backyard Stars: Landscape Lighting Ideas with String & Bistro Lights
Nothing creates instant ambiance quite like string lights dancing overhead. They’ve become a Minnesota backyard staple for good reason!
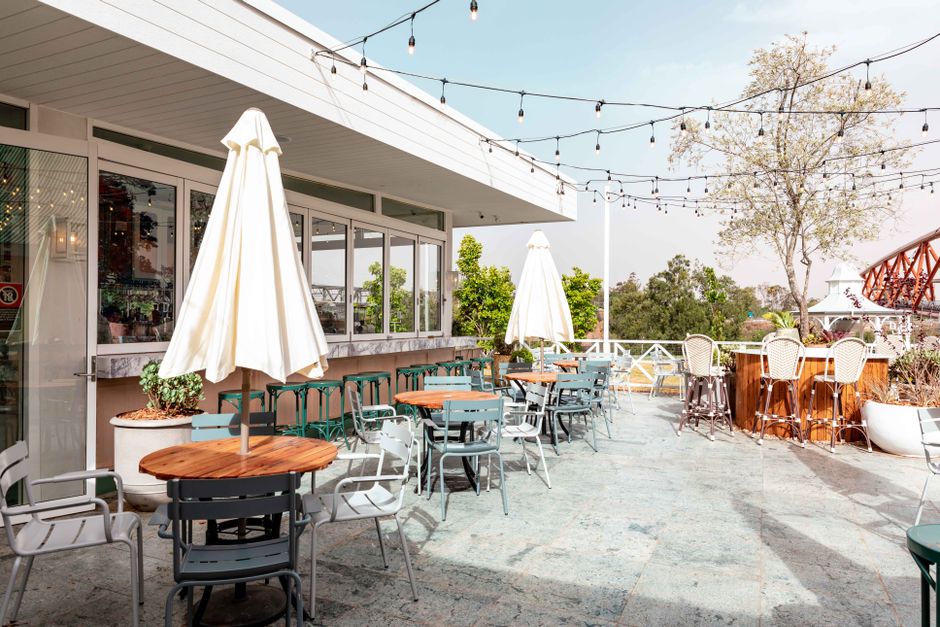
Creating a ceiling of light across your pergola transforms an ordinary structure into a magical outdoor room. The gentle glow of café-style bulbs encourages conversations to linger well into the evening. No pergola? No problem! We often help clients create DIY planter posts—simply fill wide-base planters with concrete, insert treated 4×4 posts, and voila—you have perfect anchors for stringing lights across open spaces.
For convenience, connect your string lights to remote-controlled outdoor outlets. This simple upgrade means no more fumbling in the dark or running extension cords through windows. Many of our clients love spanning lights between mature trees for a natural, organic feel. Just be sure to use tree-friendly hanging methods that won’t damage the bark.
One of the best things about string lights is their flexibility. Unlike permanent fixtures, you can reconfigure them seasonally or for special gatherings. For Minnesota’s challenging climate, invest in commercial-grade outdoor LED string lights with replaceable bulbs—they’ll withstand our weather while providing years of warm backyard ambiance.
Tree Drama with Uplights & Moonlights
Trees are nature’s sculptures, and proper lighting reveals their majesty after dark. For effective uplighting, position fixtures about 18-24 inches from the trunk, aiming upward to highlight the tree’s natural architecture. Smaller trees under 20 feet usually look best with two 20-watt uplights, while larger specimens might need three to five 35-50 watt fixtures to properly illuminate their grandeur.
The light’s color temperature matters tremendously. Evergreens pop with warmer light (2000K or under) that improves their natural coloration. For deciduous trees like maples or oaks, slightly cooler light around 3000K beautifully accentuates bark texture and branch structure.
For a truly magical effect, try moonlighting. This technique places downlights high in the tree canopy, creating dappled shadows below that mimic natural moonlight. It’s particularly enchanting over seating areas, where it creates the feeling of dining beneath a luminous forest canopy.
As advocates for our local wildlife, we recommend programming tree lighting on timers to provide periods of darkness for nocturnal creatures. Motion sensors work wonderfully for areas that don’t need constant illumination. And don’t forget to adjust your fixtures seasonally—what works for summer’s full foliage might need tweaking for winter’s bare branches.
Water & Fire Feature Highlights
Water features become even more captivating after dark with thoughtful illumination. Submersible well-lights rated IP68 can be fully immersed in ponds or pools, creating dramatic underwater glows that bring water to life. Position them to catch droplets in fountains and you’ll create sparkling, dynamic effects as water dances through the light.
For pond edges, subtle lighting improves safety while creating mesmerizing reflections on the water surface. We often install these in a way that conceals the fixture itself, letting visitors focus on the magical effect rather than the technology creating it.
Fire features provide their own warm glow, but supplementary lighting around the perimeter improves safety and defines the space when the fire isn’t lit. When water and fire elements exist near each other, thoughtful lighting creates stunning contrasts between cool blue water tones and warm amber flames. For more inspiration, explore our outdoor fire feature ideas.
Water feature lighting requires special attention to electrical safety. Always use fixtures specifically rated for underwater use, and ensure all connections remain protected from moisture. Our installation teams are meticulous about these safety details.
Architectural Accents & Fence Grazing
Your home’s architectural features deserve their moment in the spotlight. Wall washing—positioning flood lights at the base of walls—creates an even glow that highlights texture and color. This technique transforms ordinary surfaces like stone, brick, or wood into dramatic nighttime features.
For more texture emphasis, try grazing. Place lights close to walls or fences with the beam running parallel to the surface. This creates dramatic shadows in the surface irregularities, bringing textured materials to life after dark.
Frame your entrance by uplighting columns or posts flanking your front door or driveway. This not only creates a grand welcome but also improves security by clearly defining your home’s entry points. And while you’re illuminating the entrance, ensure visitors can easily locate your home by highlighting your address with a focused spotlight.
For artistic impact, try creating silhouette effects by positioning lights behind architectural elements or garden sculptures. This technique creates dramatic profiles against walls or fences that add depth and visual interest to your nighttime landscape.
Adjustable fixtures are ideal for architectural lighting, allowing you to precisely control beam direction and spread. This flexibility helps you highlight exactly what you want while minimizing light spill into bedrooms or neighboring properties. For more inspiration, explore our complete guide to landscape lighting ideas.
Planning & Design Essentials
Before you start placing fixtures around your yard, let’s talk about how to create a lighting plan that will make your neighbors jealous (in the best way possible).
Mapping Your Property
Grab a piece of paper and sketch out your outdoor space. Nothing fancy needed—just include your home, the major trees, pathways, and those special features you love. Mark where your electrical outlets are located too. This simple map becomes your canvas for planning where light should—and shouldn’t—go.
I always tell my clients to walk their property at dusk with this map in hand. Notice which areas naturally fall into darkness first and which features disappear as the light fades. These are your priority lighting zones!
The 20-Foot Rule
One mistake I see in many DIY lighting projects is placing fixtures too close together. Professional designers follow what we call the “20-foot rule”—spacing lights at least 20 feet apart creates distinct pools of light rather than a flat, uniform glow.
Think of it like this: your eye naturally moves from one pool of light to the next, creating visual interest and a sense of journey through your landscape. Too much light everywhere actually flattens your yard and removes all the drama.
Transformer Sizing and Placement
For low-voltage systems (the most common choice for residential properties), your transformer is the heart of your lighting system. Here’s a quick formula I use: add up the wattage of all your planned fixtures, then multiply by 1.25 to allow room for future additions. That’s your minimum transformer size.
Place your transformer near a GFCI-protected outlet, ideally in a spot that’s protected from the elements but still accessible for maintenance. Under eaves or behind larger shrubs works well—just make sure it’s not somewhere that will collect standing water.
Voltage Drop Considerations
Ever notice how holiday lights seem dimmer at the end of a long string? That’s voltage drop, and it affects landscape lighting too. The electricity weakens as it travels through wire, potentially leaving your furthest fixtures looking sad and dim.
To fight voltage drop, we recommend a hub system for most installations. Think of it like a wheel with spokes:
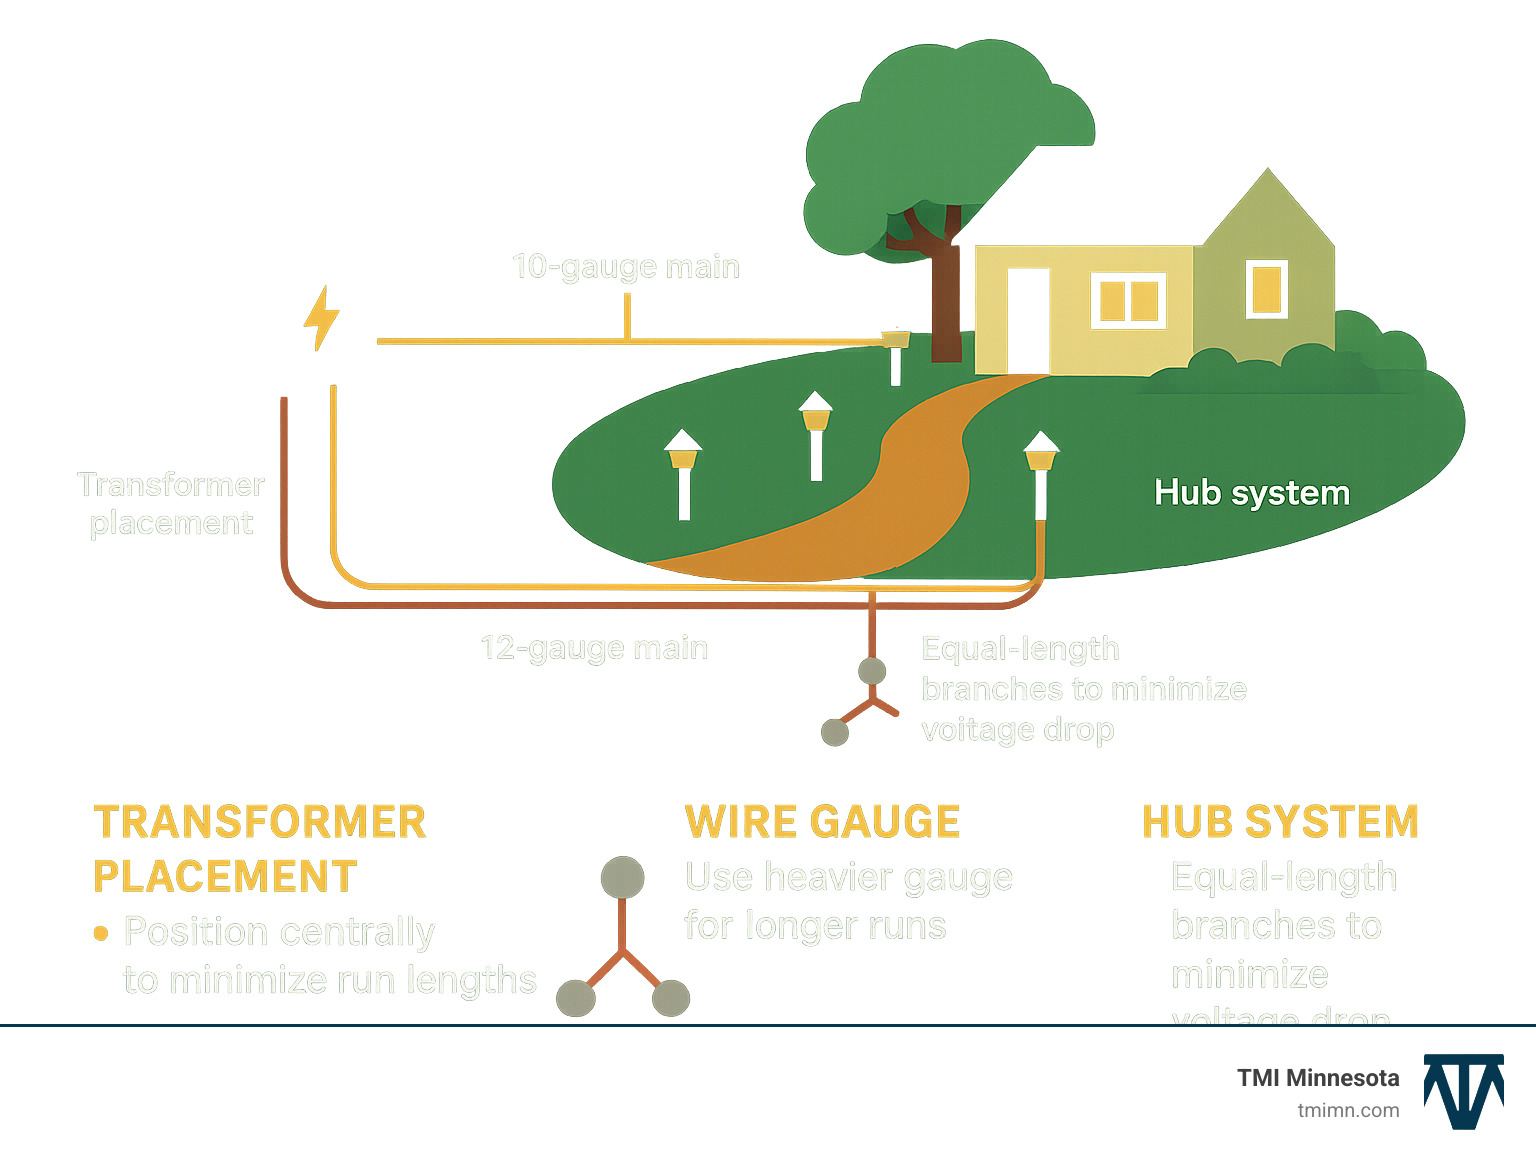
Run a heavy 10-gauge main wire from your transformer, then branch off with equal-length 12-gauge wires to groups of fixtures. This keeps voltage consistent across your entire system. For runs longer than 50 feet, you’ll want to step up to even heavier wire.
Comparing Lighting Systems
When it comes to powering your outdoor lights, you have three main options:
| System Type | Pros | Cons | Best Applications |
|---|---|---|---|
| Low-Voltage (12V) | Safer, energy-efficient, DIY-friendly, flexible design | Requires transformer, potential voltage drop issues | Most residential applications, accent lighting |
| Solar | No wiring needed, zero energy cost, easy installation | Less reliable in cloudy conditions, typically less bright | Remote areas without power access, supplementary lighting |
| Line-Voltage (120V) | Higher brightness, consistent power, no transformer needed | Requires professional installation, higher energy costs, less flexible | Large properties, commercial applications, security lighting |
For most Minnesota homes, low-voltage systems hit the sweet spot of safety, flexibility, and performance. Solar options have improved dramatically in recent years but still struggle during our cloudy winter months when you need light the most.
Controlling Glare
Nothing ruins a beautiful lighting design faster than glare—that uncomfortable brightness that hits you right in the eyes. The goal of good landscape lighting ideas is to see the effect of the light, not the light source itself.
Shield your fixtures properly by positioning them away from sight lines. When uplighting trees near seating areas, place fixtures on the far side of the trunk. For path lights, look for models with good internal baffles or caps that direct light downward.
At TMI Minnesota, we’ve solved glare issues for hundreds of Twin Cities homeowners. Sometimes it’s as simple as adjusting a fixture by a few inches or adding a small shield. These tiny tweaks can transform an uncomfortable space into a magical nighttime retreat.
Want to learn more about professional outdoor lighting installations? Check out our outdoor lighting installations guide for a deeper dive into the technical aspects of creating a system that will delight you for years to come.
Choosing Fixtures & Bulbs
When it comes to landscape lighting ideas, the fixtures and bulbs you select make all the difference between a system that wows for years and one that disappoints after just a few seasons. In Minnesota’s challenging climate, quality matters!
Material Matters
I’ve seen how material choice affects longevity in our harsh Minnesota seasons. Brass and copper fixtures might cost more upfront, but they’re absolutely worth the investment. These premium materials naturally develop a gorgeous patina over time that blends beautifully with your landscape. Many of my clients love how their copper fixtures look even better after a few years outdoors.
Aluminum fixtures can be a good middle-ground option if you’re budget-conscious. Just be sure to look for marine-grade aluminum with quality powder-coating. And while some modern composites perform well at mid-range prices, I strongly recommend avoiding those tempting plastic-coated budget fixtures. They might look fine initially, but after a winter or two, you’ll be dealing with cracking, warping, and fading.
Understanding IP Ratings
Those little “IP” numbers on fixture packaging actually tell you a lot! Think of them as your protection code – the first digit (0-6) shows how well the fixture resists dust and solid objects, while the second digit (0-8) indicates moisture protection.
For most Twin Cities yards, look for at least IP65 rated fixtures. If you’re illuminating areas near sprinklers or splashing, bump up to IP67. And for those beautiful pond or water feature lights that will be fully submerged? Don’t settle for anything less than IP68. Trust me, getting this right the first time saves headaches later!
LED vs. Halogen: No Contest
While we occasionally replace older halogen systems, we install exclusively LED lighting now – the benefits are just too compelling to ignore. LEDs use a fraction of the energy (typically 1-11 watts compared to halogen’s power-hungry 20-60 watts), and they’ll keep shining for up to 40,000 hours while halogens burn out after about 2 years.
Beyond the obvious energy savings, my clients appreciate how LEDs handle our Minnesota temperature swings much better than halogens. They’re also virtually maintenance-free, which means no more regular bulb replacements. The slightly higher initial cost pays for itself surprisingly quickly.
Color Temperature Selection
The warmth or coolness of your light, measured in Kelvins (K), dramatically affects how your landscape feels after dark. Think of it like this:
Very warm white (2000-2700K) creates that cozy, intimate campfire feeling – perfect for creating a relaxing atmosphere around patios and seating areas.
Warm white (2700-3000K) is the sweet spot for most landscape lighting ideas in Minnesota homes. It feels natural and inviting without being too yellow.
Neutral white (3000-3500K) works beautifully for highlighting water features and certain plants, providing slightly crisper definition.
Cool white (3500-4000K) can make foliage pop with vibrant color but sometimes feels less natural and inviting.
For most Twin Cities properties, we typically recommend warm white in the 2700-3000K range. It complements our northern setting beautifully and creates that welcoming glow most homeowners desire.
Lumen Output Guide
Brightness matters – but more isn’t always better! Different landscape lighting ideas require different light levels:
For path lights, 100-200 lumens provide safe navigation without overwhelming glare. Accent lights generally need 50-300 lumens, depending on the feature and distance. When spotlighting trees or architectural elements, 300-700 lumens usually does the trick. Flood lights for security or larger areas typically require 700-1,300 lumens.
Excessive brightness creates harsh shadows and uncomfortable glare that actually diminishes your landscape’s beauty. We prefer creating layers of gentle light rather than blasting your yard with high-intensity fixtures.
Beam Spread Considerations
The angle of your light beam determines how the light disperses across your landscape. Narrow beams (12-15°) create dramatic spotlighting effects perfect for highlighting specific garden sculptures or architectural details. Medium spreads (25-36°) work well for illuminating trees and larger landscape elements. Wide beams (60°+) create that beautiful wash of light across walls and broader areas.
Selecting the right beam spread ensures your light falls exactly where you want it without wasteful spill into neighbors’ yards or up into the night sky. It’s one of those details that separates amateur setups from professional-looking landscape lighting ideas.
For a deeper dive into lighting design principles, I often recommend Janet Lennox Moyer’s The Landscape Lighting Book to clients who want to understand the technical aspects before we begin their project.
Installation, Smart Controls & Maintenance
Ready to bring your landscape lighting ideas to life? Whether you’re rolling up your sleeves for a DIY project or partnering with our TMI Minnesota team, understanding these essentials will set you up for success.
Installation Basics
There’s something deeply satisfying about installing landscape lighting that transforms your property after dark. For low-voltage systems (the most common and DIY-friendly option), here’s what you need to know:
Your transformer is the heart of your lighting system. Mount it near a GFCI-protected outlet at least 12 inches above ground level to protect it from moisture. From there, lay out your main low-voltage cable according to your design plan. I recommend using sturdy 10-gauge wire for these main runs – it might cost a bit more upfront but prevents frustrating voltage drop issues down the road.
When it comes to burying those cables, don’t cut corners. A minimum depth of 6 inches protects them from accidental damage from garden tools and Minnesota’s freeze-thaw cycles. Any time your cable crosses a pathway or driveway, slip it through conduit for extra protection – future you will thank present you for this precaution!
The most common DIY mistake I see? Using those quick-connect wire nuts that aren’t truly waterproof. Invest in proper waterproof connectors designed specifically for landscape lighting. These connections will be living outside through rain, snow, and sprinkler systems for years to come.
Smart Control Options
Gone are the days of manually flipping switches or remembering to adjust timers as seasons change. Today’s landscape lighting offers brilliantly convenient control options:
Astronomical timers have become my personal favorite recommendation for Minnesota homeowners. They automatically adjust your lighting schedule based on actual sunrise and sunset times throughout the year – perfect for our dramatically shifting daylight hours between summer and winter.
Wi-Fi transformers connect to your home network, letting you control your outdoor lighting from your smartphone whether you’re on the couch or halfway around the world. Many of these systems can integrate with voice control platforms like Google Home or Amazon Alexa, so you can simply say, “Turn on the backyard lights” when heading outside for an impromptu evening gathering.
For improved security and energy savings, consider motion sensors that activate specific lights only when movement is detected. This works particularly well for side yards or areas that don’t need constant illumination.
The most sophisticated systems offer zone control, dividing your lighting into independently managed areas. This allows practical path lights to stay on all night while decorative uplighting on trees automatically turns off at midnight – giving you both safety and energy efficiency.
Maintenance Tips
Even the best landscape lighting systems need occasional TLC to keep them looking their best. Here in Minnesota, our distinct seasons create unique maintenance needs:
Spring cleaning is essential after our harsh winters. Once the snow melts, walk your property to check for fixtures that may have shifted during freeze-thaw cycles. Clean lenses thoroughly to remove winter grime and mineral deposits that can significantly diminish light output.
Summer growth often means adjusting fixture positions as plants flourish. That perfectly aimed uplight on your ornamental maple might now be blocked by lush foliage. A quick repositioning keeps your lighting design looking intentional.
Fall preparations should include checking all wire connections for signs of corrosion before winter sets in. This is also the ideal time to trim back any plants that might be encroaching on fixtures or wires.
During any maintenance visit, take time to test the voltage at your furthest fixtures. If readings are significantly lower than at fixtures closer to the transformer, you may be experiencing voltage drop that can be corrected by adjusting your wiring layout or transformer settings.
While LED technology has dramatically reduced maintenance needs (bulbs now last 7-10 years instead of just 1-2), be aware that LEDs gradually dim over time rather than suddenly burning out. If your once-dramatic lighting effects seem lackluster, it might be time for replacements.
Need help getting started with your landscape lighting ideas? Our TMI Minnesota team offers both full-service installation and consultation for DIY enthusiasts. Learn more about our approach to hardscape lighting installation or explore professional resources at the FX Luminaire Learning Center for additional technical guidance.
Frequently Asked Questions about Landscape Lighting
How many lumens do I need for paths, accents and floods?
Figuring out the right brightness for your outdoor lighting can feel a bit like Goldilocks – too bright creates harsh glare, too dim leaves you squinting in the dark. Let me break this down into something practical you can use right away.
For path lighting, aim for that sweet spot of 100-200 lumens. This gives guests enough light to steer safely without feeling like they’re walking down an airport runway! I’ve found that fixtures on the lower end of this range create a more intimate, welcoming atmosphere while still preventing any midnight stumbles.
When it comes to accent lighting for your prized Japanese maple or garden sculpture, 50-300 lumens typically does the trick. Smaller garden elements look perfect with lighting on the lower end, while that magnificent oak might need the full 300 lumens to showcase its majestic structure after dark.
Need to light up larger areas like driveways? Flood lighting in the 700-1,300 lumen range provides excellent visibility without creating that harsh, institutional feel. Meanwhile, spotlighting for trees or architectural features works best between 300-700 lumens – enough intensity to create drama without overwhelming the space.
One insider tip I love sharing with clients: the color temperature of your lights actually affects how bright they appear. Even at identical lumen outputs, cooler lights (higher Kelvin) will seem brighter than warmer ones – something worth considering when planning your landscape lighting ideas.
What spacing and aiming give the best results?
The difference between amateur and professional-looking landscape lighting ideas often comes down to thoughtful spacing and precise aiming. Here’s what I’ve learned after years of installations across Minnesota:
For path lights, space them about 10-15 feet apart for standard low-voltage fixtures. If you’re going solar, tighten that spacing to 6-8 feet since these typically produce less light. This creates inviting pools of illumination that naturally guide movement rather than a harsh, continuous strip of light.
I always remind homeowners about what lighting designers call the “20-foot rule” – keeping fixtures at least 20 feet apart throughout the landscape. This creates those distinct pools of light that add depth and interest to your yard, guiding the eye from one beautiful vignette to the next.
When uplighting trees or architectural features, position your fixtures about 18-24 inches from the base. A 45° angle usually creates the most natural, flattering effect that highlights texture while minimizing harsh shadows.
Glare prevention might be the most overlooked aspect of good lighting design. Always aim fixtures away from where people will typically be looking. Even the most beautiful lighting effect loses its magic when you’re squinting past a bright bulb!
The real secret to professional results? Layering. Combining different techniques – some uplighting on trees, gentle path lighting, and perhaps downlighting from a pergola – creates a rich, dimensional landscape that feels magical after dark. Using just one technique throughout tends to fall flat, regardless of how good your fixtures are.
Should I pick solar, low-voltage, or high-voltage systems?
Choosing the right system type is one of the most important decisions for your landscape lighting ideas. Each option has distinct advantages that might make it perfect – or problematic – for your specific needs.
Solar lighting offers wonderful simplicity – no wiring, no electricity costs, and installation so easy anyone can do it. It’s perfect for highlighting remote garden areas where running electrical would be prohibitively expensive. The downside? Here in Minnesota, winter’s shorter days mean less charging time, and cloudy periods can leave your lights dimmer than desired. They also typically produce less light overall and may need replacement sooner than wired options.
Low-voltage (12V) systems hit the sweet spot for most Twin Cities homeowners. They’re safe enough for DIY installation (though many prefer professional help), energy-efficient, and offer tremendous design flexibility. The wide variety of high-quality fixtures available means you can create exactly the look you want. While they do require a transformer and some planning to prevent voltage drop on longer runs, these systems provide the best balance of safety, efficiency, and beautiful results for most residential properties.
Line-voltage (120V) lighting brings maximum brightness and consistent power delivery without worrying about transformers. However, installation requires a licensed electrician, costs more to operate, and offers less flexibility for future changes. These systems make sense for very large properties, commercial installations, or situations requiring exceptionally bright security lighting.
For most Minnesota homes, I recommend low-voltage LED systems. They provide professional-quality results while remaining energy-efficient (especially important during our long winter nights) and can be easily adapted as your landscape evolves. Plus, their lower voltage makes them inherently safer around children, pets, and water features.
Want to explore which landscape lighting ideas would work best for your specific property? The team at TMI Minnesota can help you steer these options with a personalized consultation that considers your unique landscape, priorities, and budget.
Conclusion
Thoughtful landscape lighting ideas transform your outdoor spaces into something truly magical after dark. It’s not just about seeing where you’re walking—it’s about creating an entirely new dimension to your landscape that emerges when the sun sets. The right lighting brings drama to trees, warmth to gathering spaces, and safety to pathways, all while showcasing the unique character of your home.
Here in Minnesota, we understand how precious our outdoor time is. With the right lighting, you can extend those enjoyable moments well into the evening, turning your backyard into a retreat that feels both intimate and expansive under the night sky.
At TMI Minnesota, we’re passionate about helping Twin Cities homeowners find the perfect lighting solutions for their unique properties. Our team knows exactly how to design systems that not only withstand our challenging northern winters but continue performing beautifully through every season. We carefully consider everything from fixture placement to beam angles, creating layers of light that add depth and dimension to your outdoor spaces.
Whether you’re primarily concerned with security, looking to host more evening gatherings, or simply want to enjoy the beauty of your landscape after dark, we’d love to help bring your vision to life. Our approach goes beyond simply installing fixtures—we create comprehensive lighting experiences that transform how you use and enjoy your outdoor spaces.
Ready to see your landscape in a whole new light? We’d be delighted to schedule a design consultation to explore how the right lighting can improve your property’s unique features. And while you’re thinking about outdoor improvements, don’t forget to check out our other services including outdoor fire feature ideas, garden lighting installation, and modern outdoor designs that can complement your lighting beautifully.
The most effective landscape lighting isn’t about quantity—it’s about thoughtful design that highlights what makes your property special. The right fixtures, properly placed, create an atmosphere that feels both welcoming and enchanting. Let us help you find how landscape lighting ideas can transform your outdoor living experience into something truly extraordinary.